

Streaming a Switch 2 to YouTube via a capture card: picking hardware, wiring, and OBS setup
Wanted to record the story playthrough of a game on Switch 2, and streaming to YouTube (with a local recording as backup) was the plan. The desktop is an RTX 3080 with dual monitors (BenQ MOBIUZ EX2710U 4K main, Prism W270 secondary) and no capture card to start with — here’s the full process from picking hardware to wiring it up.
Why you need a capture card
The Switch 2 dock outputs HDMI, and a PC can’t read that signal directly — it has to go through a capture card that converts HDMI into a USB signal the PC can consume, which is what OBS actually captures.
Picking a capture card: two specs that get confused
The easiest trap to fall into: looking at only one “resolution” number, then discovering after purchase that your gaming display got downgraded. A capture card actually runs two independent signal paths internally:
- Passthrough: the signal passes through unchanged from HDMI OUT to your monitor — this is what you actually see while playing
- Capture: the signal gets digitized and compressed, then sent over USB to the PC — this is what feeds OBS for streaming/recording
These two specs are frequently mismatched. Cheap no-name capture dongles are the worst offenders: advertised as “4K support” usually means passthrough only, while actual capture tops out at 1080p30 — or worse, there’s no dedicated passthrough circuit at all, so your monitor gets downgraded to whatever the capture resolution is the moment you plug it in.
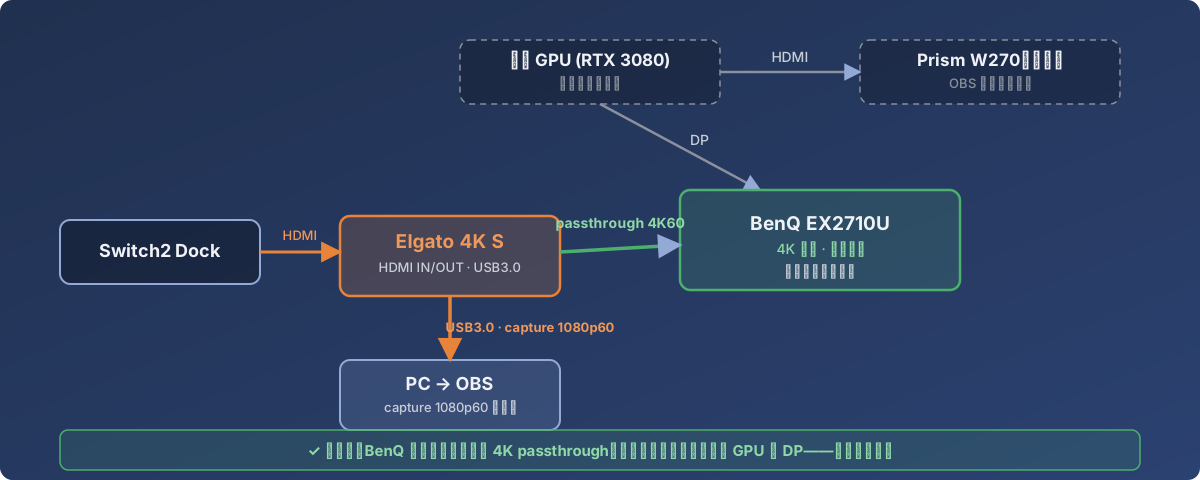
The dashed gray box is the existing wiring that doesn’t change (GPU’s DP/HDMI outputs stay as-is). The orange/green part is what’s new — the Switch goes into the capture card first, which then splits into two paths: 4K60 passthrough to the BenQ monitor (no quality loss) and a USB3.0 feed to the PC for streaming.
Before buying, just check two numbers:
- Passthrough ≥ the gaming quality you want (e.g. 4K60, so the monitor doesn’t get downgraded while playing)
- Capture ≥ the streaming quality you want (1080p60 is plenty for YouTube live — no need to pay extra for 4K capture)
A quick comparison of common options:
| Model | Capture | Passthrough | Notes |
|---|---|---|---|
| Elgato HD60 X | 1080p60 | 4K60 HDR | Great value, spec matches a 1080p60 streaming need exactly |
| Elgato 4K S | 2160p60 (HDR capture capped at 1080p60) | 2160p60 / 1440p120 / 1080p240 | Pick this if you want headroom for 4K streaming later |
| AVerMedia Live Gamer Mini | 1080p60 | 1080p60 | Compact, but passthrough also caps at 1080p60 — a 4K monitor gets downgraded |
| Generic no-name USB dongles | Usually 1080p30 | Often no dedicated passthrough | Cheap, but quality/latency/stability are a gamble |
Ended up going with the Elgato 4K S: passthrough goes up to 2160p60, so the BenQ monitor stays native 4K while playing; capture is set to 1080p60 for streaming — the two paths don’t interfere with each other.
Wiring: how the two monitors split the job
The key realization: adding a capture card doesn’t change your existing input-switching habit — it just inserts one extra box in the middle of the Switch’s HDMI cable.
- Switch 2 Dock → capture card HDMI IN
- Capture card HDMI OUT (passthrough) → the same HDMI port on the BenQ EX2710U that the Switch used to plug into directly (switch to this input to play, exactly as before)
- Capture card USB3.0 → PC (feeds OBS)
- GPU DP → BenQ (desktop use, unchanged)
- GPU HDMI → Prism W270 (unchanged — stays the dedicated OBS control monitor: scene switching, YouTube Studio dashboard, chat)
OBS settings (RTX 3080)
Let the GPU handle encoding so the CPU stays free:
- Encoder: NVIDIA NVENC H.264 (new) (RTX 3080 is a 2nd-gen Ampere encoder, no AV1 encode — H.264 is the safe choice)
- Rate control: CBR
- Bitrate: 8000-9000 Kbps for 1080p60 (measured upload speed is 219 Mbps, nowhere near the bottleneck — bitrate is capped by desired quality, not bandwidth)
- Keyframe interval: 2
- Preset: Quality / P5-P6
Add the source as a “Video Capture Device” and select the Elgato 4K S.
Audio: Elgato is far less fiddly than generic cards
Elgato cards bundle video and audio into a single capture device — adding the video capture source in OBS pulls the audio in automatically, no need to add a separate audio input source and fight sync issues like you would with cheap dongles. Two things worth checking:
- Install Elgato’s official driver first, or OBS won’t detect the card correctly
- In Advanced Audio Properties, set this track’s Audio Monitoring to Monitor Off — you’re already hearing game audio directly off the screen, so having OBS monitor it too introduces a few dozen milliseconds of delay that sounds like an echo
Setting up the YouTube live stream
- YouTube Studio → Settings → Channel → Feature eligibility → enable live streaming (new channels need ~24 hours to activate, phone verification required)
- Create → Go live → grab the Stream Key + server URL
- OBS → Settings → Stream → Service: YouTube - RTMPS, paste the Stream Key
- Run a private/unlisted test stream first to confirm video and audio before going public
- Also check “Record locally” in OBS — a full local recording as a safety net if the live stream hiccups